
Know Your Customer (KYC)
Tip: To use the Temenos developer sandbox, you'll need an API key. To learn more, see the Sandbox Guide.
This guide explains how to carry out risk calculations, often referred to as KYC, on customers using several different APIs.
What is KYC?
It's a risk-management solution that allows banks to standardize the risk calculation process based on customer attributes.
Make risk assessments, not only during account opening, but also during the entire customer lifecycle.
More thorough and advanced than standard Know Your Customer (KYC) solutions, we use a comprehensive risk matrix, which includes the status, range, and helps calculate risk based on customers’ attributes.
KYC workflow builder uses configurable, dynamic forms providing tailored questions to each specific profile, which are available via APIs.
The system also offers the ability to add search criteria filters or create, amend or delete assessments. It uses advanced and fully configurable algorithms to calculate compliance risk scores of new and existing customers based on the customer profile. The system provides greater flexibility, accuracy, and control.
The KYC collection of APIs enables you to:
- Screen a new customer against configured watch-lists
- Collect KYC data in to facilitate risk scoring
- KYC risk score a new customer
Onboarding Customer Scan API
All banks are legally obliged to ensure new customers aren't sanctioned individuals or entities, or linked to the same. They should also understand if customers are ‘politically exposed’ (a Politically Exposed Person (PEP)) or have negative news associated with them.
This API facilitates this check to FCM, validating against the configured watch lists, which can include those of the users own creation, returning a hit or no-hit.
Customer Form Submission API
To onboard a new customer, banks need to risk score them for their propensity toward financial crime. This process is generally mandatory as part of regional Anti Money Laundering (AML) regulation.
KYC Risk Scoring contributes to a bank’s wider AML program, where a Risk Based Approach (RBA) is employed to ensure checks and balances are attributed to what's considered riskier business and less risky business is allowed to flow freer with less friction.
Generally, a compliance officer will decide what data needs to be collected to carry out this process, which may vary dependent on the type of client and the attributes of a client, for example answering yes to one question might give rise to further related questions.
This API is used to retrieve the configured question from FCM so that they can be surfaced in a client onboarding process/system. The API also allows the passing back of the response so the customer can be risk scored in a following process.
Customer Risk Computation API
To onboard a new customer banks need to risk score them for their propensity toward financial crime. This process is generally mandatory as part of regional Anti-Money Laundering (AML) regulation. KYC Risk Scoring is also contributory to a bank’s wider AML program, where a Risk Based Approach (RBA) is employed to ensure checks and balances are attributed to what is considered riskier business and less risky business is allowed to flow freer with less friction.
Once the necessary data has been collected, potentially via the FCM Customer Form Submission API, this API allows the user to obtain the risk score for a given customer. A score is returned together with a risk level of low, medium or high, and an ‘allow or not’ indicator.
Note: The tolerance to ‘allow’ is set within the FCM system.
Getting Information about the Customer
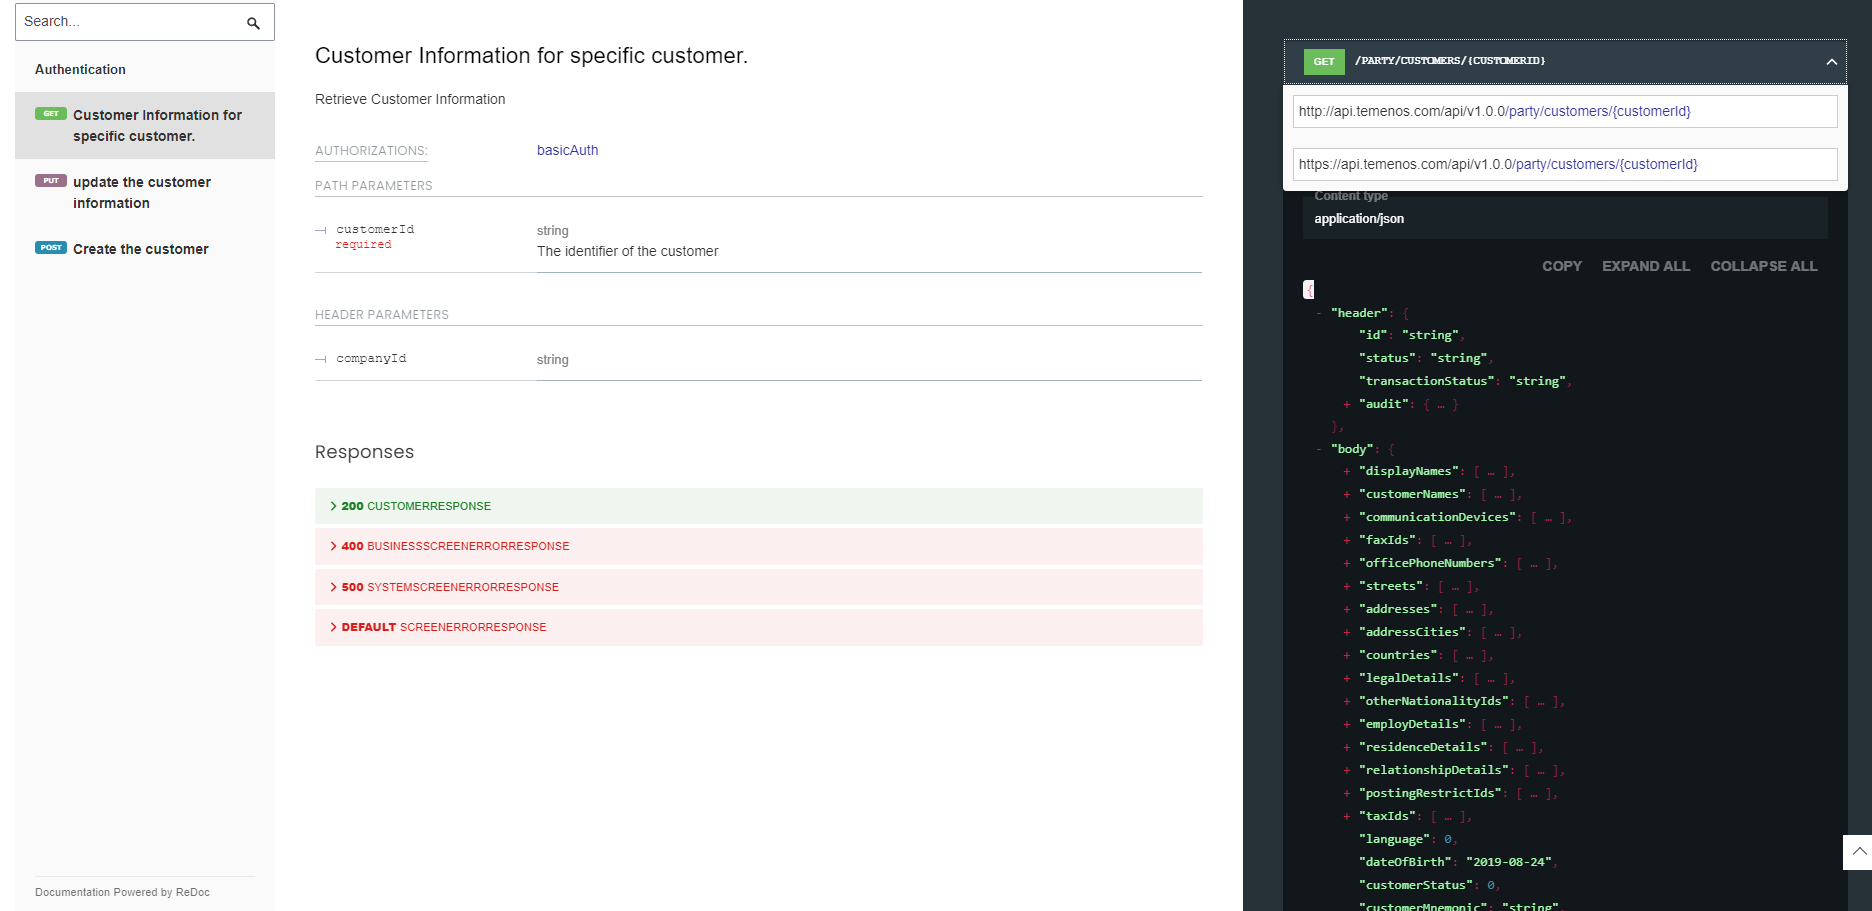
The party/customers API is the easiest way to get information about all the customers present in the sandbox. This will help you decipher the data present for future API requests. You can see the description of the API in the screenshot below:
Calling the API in Postman
To call the API in Postman, add the endpoint (/party/customers/{customerId}) to the sandbox URL (https://api.temenos.com/api/v1.0.0). The request works as below (don’t forget to put your API key in the headers tab). Use 100336 as sample customer ID. If you omit the customer ID, then you access another API endpoint that fetches all customers.
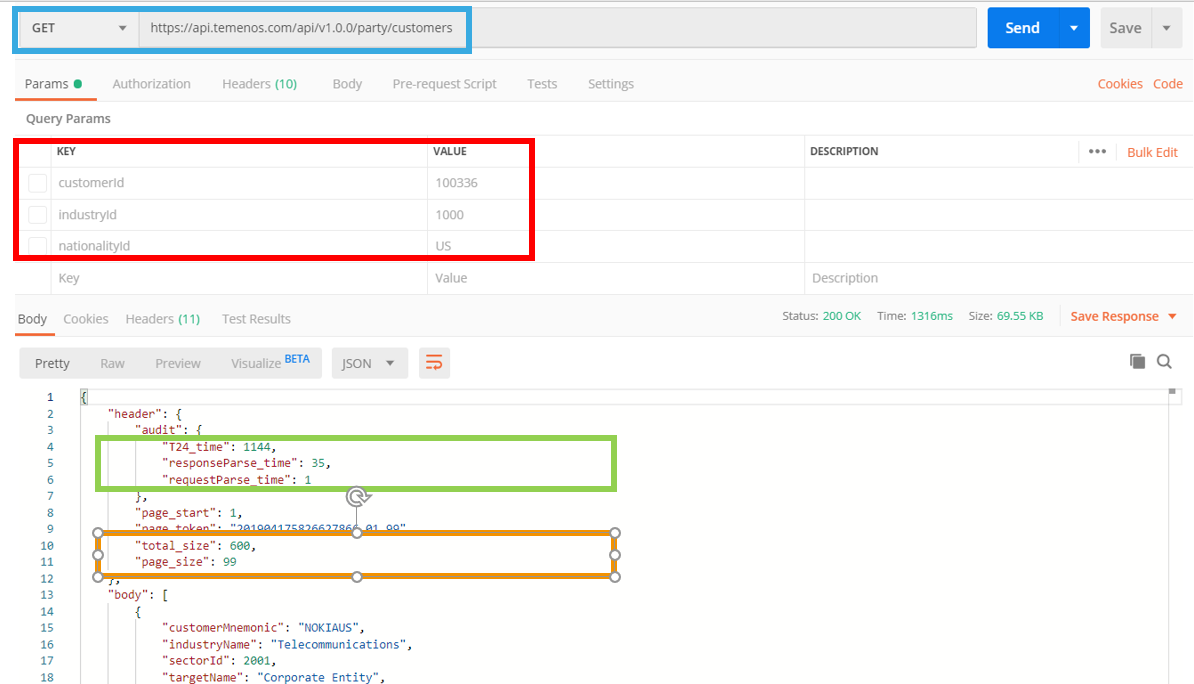
- The blue box is the URL
- The red box shows some potential URL filters (that we get from the Swagger specification)
- The green box shows the response times of the sandbox
- The orange box shows the number of records returned and the total number of records
Retrieving a specific customer's information
Previously we've used an example of a generic customer API that returns a lot of information about the customer. The generic API is useful for many use cases, however, most of the time we do need to retrieve specific information about the customer to implement a specific interface. While we could use the generic API to get all the information and then pick up the fields we need, there could be some issues with this approach:
- We're inducing performance overheads, which in high traffic situations can be significant.
- We're forcing the integration developer to do additional work.
Note: The customer data model of Temenos Transact has more than 200 fields out of the box and a generic API would be particularly cumbersome.
For these reasons, the API catalogue offers specialized APIs for critical banking areas that typically drive a lot of traffic (such as customer information), which return only subsets of data for particular use cases. Some examples:
Customer KYC details GET: /party/customers/{customerId}/KYC
This API returns information regarding any AML checks conducted for this customer. The payload returned looks like this.
Note: We're only storing in Transact and returning only basic information because we don’t want to expose sensitive data of compliance nature even to internal bank employees.

Customer Documents GET: party/customers/{customerId}/documents
This API returns information about documents we store for a customer. The payload below includes an image ID (which is used in Transact to display the image of the document in the user interface) and the link of the actual document, which resides in the configured document management system we have integrated with.

It's easy to explore these APIs on your own, using a customer ID like 100336 that's populated with data in our sandbox environment. To help you experiment with these APIs, API collections are available so you can download these calls and simply input your API key to immediately start using them. The section below explains how this works and how you can import these examples for quick testing.
Using Postman Collections to test the APIs
Postman is an API testing application you can easily download - Download Postman.
Once you download and install, open the application and click the import button (blue box on the screenshot below). Get the files attached to this article (3 .json files) and drag/drop them into the box that will popup. This will import:
- The API collection with the customer API examples we described above
- Connection details to the developer portal
- Connection details to your localhost (for those that have Transact installed locally - if you plan on working with the online Sandbox, don't import this file).

The two environments will appear on the top-right side (red box in the screenshot) and if someone has multiple environments, this makes it very easy to call APIs easily on the one you want to! The environment details fill in the parameters of the URL (orange box in the screenshot above) and of course your API key to each API call in case you are hitting the developer portal.
IMPORTANT: Once you install the files you have downloaded, click on the eye icon next to the red box shown in the screenshot. Paste there your Developer Portal API key. Without this, the developer portal will return an authentication error.
Once you have done this, you can easily test all the APIs by selecting them from the left side (green box). Within Postman you can change the parameters of each GET API, modify any required headers and for POST/PUT calls provide the .json payload.
In subsequent articles we will be updating the API collection with many more API examples, allowing you to easily test everything we have covered in this article series. Obviously, you can browse the developer portal, find additional APIs and add them to your own collection if you want to.
[Update July 2020] Please note that the APIs provided in this collection has been tested by the author against the 202004 release that is currently live in the portal.
We will now start our exciting journey of creating/changing customer information via API. Note that the developer portal sandbox is a shared resource, which means data is not persistent and subject to change.
Transact is a customer-centric solution and the primary entity against which everything is mapped is the Customer. Consequently, customer creation is a good place to start when learning about Transact APIs. In the Postman collection accompanying this article, you will find a customer creation example (POST API) with a pretty comprehensive payload. An additional attachment includes the Swagger specification with all the fields available to be used in the payload.
Once you try this, you will most likely get an Error. The error will be related to Override Management and at the end of this article, we will explain how the mechanism works and what needs to be done to bypass it.
Updating Customer Information
Updating information is performed using a PUT API. When updating information, we are using the customer ID as a URL Parameter. All the information that has to be updated based on the Swagger specification should be added to the payload.
In the screenshot below you can see the two APIs we have used so far (blue box).

Managing Overrides
We will now move to one of the most interesting features of the APIs, which is Override Management. Overrides are a mechanism of Transact to provide warnings on user levels for specific actions which alert them to either stop their action or acknowledge that an exception needs to take place and accept the Override.
In case a specific override needs to be removed, this is possible by configuring the Override record entry to Auto for the API channel.
In the sandbox environment behind the API portal, Overrides exist and we will be using the interactive mechanism provided by the API framework to bypass these.
You can see how this works in the screenshot above (green box).
When submitting a transaction/record via a PUT or POST API, if an override is triggered an error will be returned with the override message in the body of the response. To accept the override, the application developer using the API needs to perform a second call, passing the exact override message as a parameter in the header.
In the example we are using here, there are two overrides. The first override asks us if we have received the required documents from the customer as per the onboarding process. The 2nd override implements the Transact duplicate protection (which you will be triggering in the portal every time you use the attached example since I have already used this customer name/surname to test while writing this article!)
There are two additional things to note here:
- In the first override, you can see two options available to answer the override, a positive and a negative. Without trying it, what do you think would happen if you respond NOT RECEIVED? Go try and see if you were right
- In both overrides, you see that the customer ID is passed in the override description text as a parameter. Make sure that you pass in the header the appropriate parameters received in the first call you are doing to bypass the override, otherwise an error will trigger.
API Used :
| API | Links |
|---|---|
| Customer Management | https://developer.temenos.com/service/customer-management#operation/getCustomerLegalDocuments |